

How To Clean A Wound To Avoid Tetanus
Many people learn how to stitch (suture), staple, glue, or otherwise shut a wound because they imagine an emergency situation where the only chance of survival is a MacGyver surgery hack with a fishing needle and dental floss. It'due south one of those skills that just seems cool — similar something a Legit Prepper should know.
Reality is a fiddling different. Even if you're dealing with a bad injury in a SHTF scenario, forcefully closing a wound is a terminal resort.
It's also hard and risky to exercise without the proper medical gear — and so don't depend on fishing hooks or your crimson Milton role stapler.
The simpler solution is well-nigh always the right 1, and all but the most severe wounds will eventually close on their own with proper attention. Even for those that should be closed, research shows it'south often better to go out the wound open for the showtime day or two.
Endmost a wound is the third (optional) pace in the overall process:
- Stop any bleeding (apply a tourniquet if information technology's serious)
- Make clean the wound
- Close the wound with strips, sutures, staples, or glue (if information technology makes sense to)
- Protect the wound with dressings and bandages
Summary of how to close a wound:
- The vast bulk of wounds should be left to heal naturally
- Serious wounds in areas with activity or tension (such as an elbow or scalp) are more than likely to demand closure because the wound is more likely to split open during healing
- Steri-strips and butterfly bandages are commonly the best option
- Stapling is easy, if you lot take the right equipment
- Stitching is difficult if you've never good, but information technology'south the best method for high-tension or serious wounds
- Glue works, just it's a last resort (peculiarly if using over-the-counter superglue) that makes it hard to encounter and bargain with infections
Use your head. Get professional person help if you can.
The Prepared teaches survival medicine: what to do in emergencies when you lot can't depend on normal assist or supplies. How to brand decisions, steps to take, gear to use… at that place's a huge difference in the right answers between daily life and a survival situation.
You lot agree not to concord u.s.a. responsible if yous choose to practice something stupid anyway.
Want more than costless guides from medical and survival experts delivered straight to your inbox?
Why you should trust us
Your 3 guides have 80 years of combined experience education or using these skills:
- Website
Tom Rader. 18 years in emergency medicine. Former paramedic and Navy Corpsman (medic) with Marine Recon in Iraq. Teaches wilderness medicine nationwide to students including wildland firefighters, kickoff responders, and remote populations..
Dave is a retired Forest Ranger and Tactical Medic, and currently teaches several Wilderness Medicine programs. In add-on to involvement with medicine since the '80s he besides has degrees in Wilderness Recreation Leadership and Forest Technology.
Mike Ruane retired after 27 years in emergency medicine as a paramedic and nurse. His career spanned from the streets of east Oakland to teaching war machine special warfare medics.
What is a suture?
Suture is just the medical term for normal stitches using a needle and thread — staples, butterflies, and other closure methods are not considered a suture.
Sutures are the strongest manner to concur a serious wound together, especially on parts of the body where a wound is prone to splitting back open up from activity. This speeds upwardly the healing procedure since at that place is less empty space the body needs to create new tissue for.
Stitches as well assist reduce scarring. Although reducing scarring may seem like a superficial cosmetic concern, it's actually a medical priority because scar tissue inhibits movement and normal body function.
How to decide if and when to shut a wound
Knowing when to close or suture a wound is just as important as how.
The right answer in the vast majority of situations is to let the wound heal on its own — including nasty injuries in an austere survival situation with no access to professional medical help.
Fifty-fifty trained field medics just consider forced closure in any course when the wound is in a loftier-movement part of the body or very serious, deep, or long.
Closing a wound prematurely increases the chance of infection and makes it harder to handle infections that practise popular up. (Keep in mind that infections are the biggest threat to a wound.)
Fifty-fifty in austere situations where a wound is the right type for forced closure, enquiry shows information technology'due south usually better to wait a few hours or days after the injury earlier closing (called Delayed Master Closure) then you can keep an eye on potential infection, handle whatsoever pus and drainage, re-make clean the wound if needed, then on.
There's also the added risks of forced closure. Even if yous have a sterile suture kit with all the right gear, you're even so poking holes in flesh or adding chemicals that can potentially create more problems. And it'south unlikely yous tin depend on a clean working surroundings and tools or follow-up antibiotics in a survival state of affairs.
Endmost a wound with contagion still inside is a recipe for disaster. Even if you've cleaned the wound properly, there's likely still some microorganisms within, and leaving the wound open for a day or two gives the body more time to "push out the bad stuff."
1 of the biggest factors is wound location. The purpose of sutures, staples, steri-strips, and gum is to prevent a wound from splitting open up while healing. That's more probable to happen in high-activeness or high-tension areas of the trunk.
Common body spots for sutures and closures:
- All joints
- Brow and scalp (although information technology doesn't movement as much, the skin is tight)
- Barrel cheek
- Dorsum (particularly if carrying a bag or other dynamic movements)
- Anxiety
For example, we once did a quick stapling on the shrapnel-cut butt cheek of a Marine in gainsay because they were notwithstanding going to be actively engaged in fast motion, long rucks, and fighting for another 12+ hours. That meant fifty-fifty a great bandaging job would've split apart as their legs and hips moved around.
But if that Marine had residuum time soon afterwards the wound, we wouldn't have forced it closed at all.
How to practice
Quick Option
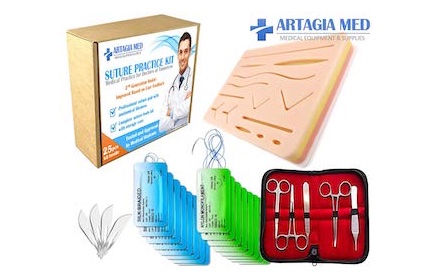
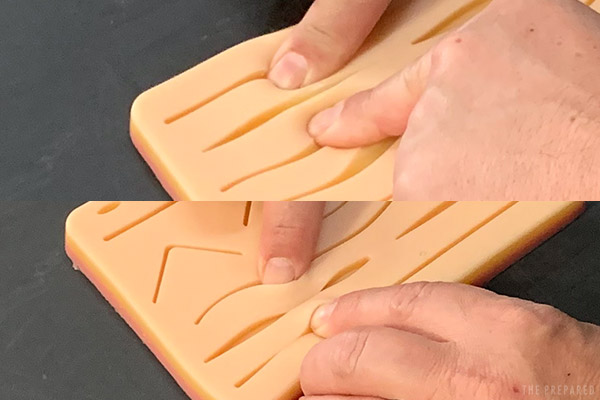
Practice Suture Kit
Comes with a "fleshy" silicone pad with pre-cut injuries and a 25 piece suture kit. The same kit used in our how-to pictures.
- Encounter price on Amazon
Like any other survival skill, y'all should practice closing a wound earlier an emergency. Gluing and stapling are pretty directly frontwards, just suturing can be challenging — especially the knots.
If you don't get one of the proper exercise kits, you lot tin can utilise a grunter human foot (the skin is similar to a human), chicken breast, or banana.
Approximate the edges, but avoid eversion
Wounds are rarely a clean, directly line. You'll want to pay attending to lining upward the edges before forced closure and so that the wound heals cleanly and angled torquing forces don't pull it apart.
"Approximating a wound" is the process of lining upwards the edges. This is usually washed with your (clean or gloved) hands as you're closing or bandaging. Be conscientious with your fingers when using needles.
You may encounter techniques that recommend "everting" the edge of the wound when yous approximate past pushing the wound edges upward, as if you're trying to create a skin pyramid. It was originally thought that this would reduce scar formation equally wounds tend to flatten out during healing.
Current research, nevertheless, doesn't support this dogmatic exercise.
Information technology is much more important to line the edges upward and keep them flat. The research is clear about one point: make sure the edges are not inverted (tenting downward) into a canyon. Inversion will cause a larger scar that has a trend to pucker inward.
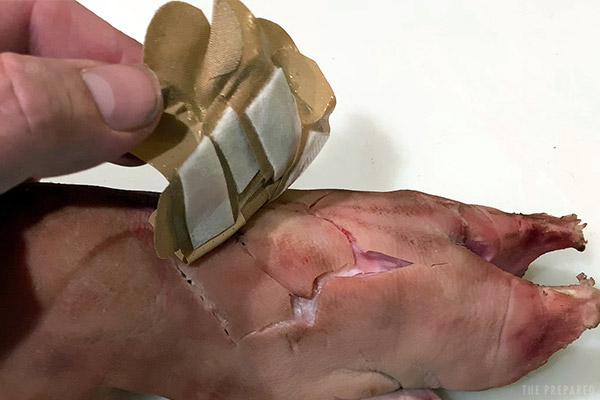
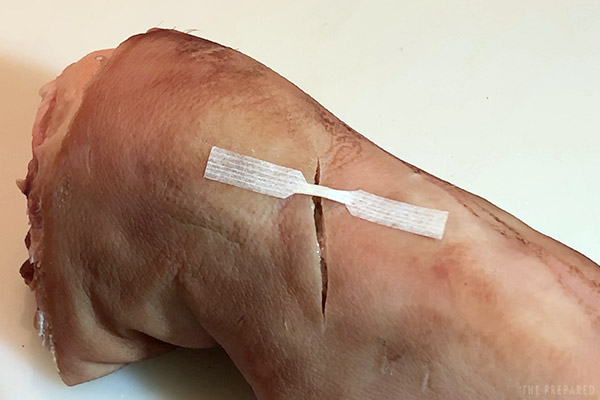
Steri-strips, butterflies, and other unproblematic closures are the correct reply in most cases
Steri-strips and butterfly bandages are the best mode to close all just the almost at-risk wounds. They're cheap, common, intuitive, easy to remove if you need to re-clean the injury, and don't poke holes in patients.
Very complex or irregular wounds tin go tricky. Only take a moment to think through the skin design and how many supplies you have to piece of work with before you commencement your piece of work.
Steri-strips are adhesive across the entire strip. Butterflies have a not-adhesive department in the middle.
If you think the wound is probable to get infected or you'll need to alter the closures often due weather or activity, endeavor to use a butterfly to reduce the hazard of adhesive sticking to the wound.
You tin can plow a steri-strip (or even tape) into a butterfly bandage using your survival pocketknife. Cut little wings along both edges of the eye of the strip, folding them inward on the adhesive side to block the stickiness.
How to apply strip bandages:
- Estimate the edges of the wound using your (make clean) fingers.
- Start in the middle of the wound. If you go outside-in you might cease upwards with an odd bubble in the center.
- If using a butterfly, you want to align the strip and so the non-adhesive part goes over the wound when airtight.
- Apply, and printing down to make certain it seals to the skin.
- Alternate placing strips above and below the first strip. Stay 1/viii to 1/four of an inch apart — likewise much space between them increases the tension on each one.
- Once finished, you tin can identify more strips or record at the ends of the bandages in parallel to the wound to anchor them down against the peel.
Tip: Some other technique for helping secure strip bandages is to utilise tincture of benzoin. Clean the area y'all want to adhere with an booze prep pad and then apply some benzoin to the expanse. Identify the adhesive cast over top.
ZipStitch
ZipStitch is a newer commercial product that'south gone viral within the survival community because information technology looks great and like shooting fish in a barrel:
We beloved to see more innovation in this market and like the ZipStitch'south all-in-one package. They'll probable hold up to more corruption than a standard strip or butterfly, as well.
But at a whopping $xxx each, the ZipStitch merely isn't worth it for virtually people. Plus the zip tie portion is rigid and doesn't lay flat confronting the skin, making it more probable to get snagged or poke through bandages. And if yous brand a mistake, you accept to throw the whole thing out (merely like a normal cypher tie).
Suture kit
The basics of a good emergency suture kit:
- Suture material/thread and curved needle. This is how commercial sutures typically come.
- Forceps. Y'all may see these referred to a "needle drivers."
- Scissors. For cutting the thread subsequently each throw.
- Tissue forceps. These await like tweezers with a unmarried tooth on ane side and ii teeth on the other, which are used to gently grip the edge of the peel for manipulation.
- Scalpel blade. Tin be used for trimming away dead tissue.
There'southward a bewildering assortment of suture cloth options. Each type has strengths and weaknesses for dissimilar types of tissue.
We recommend non-absorbable nylon considering information technology has the best forcefulness while retaining some elasticity (which helps if the wound swells).
You should always opt for a curved needle. The most common (and nearly appropriate for preppers) is a "3/8 circle."
If you have to get creative with random tools — like sewing needles, dental floss, or angling line — do your best to make them sterile and be prepared for a more complicated task with higher chance of infection.
Tip: The smaller the start number on the suture, the stronger the thread (tensile strength). ii/0 is stronger than 6/0.
How to stitch a wound
If yous're taking a sterile needle and thread from a closed suture kit, don't touch it with anything but your make clean tool and clean/gloved hands. Unwind all of the suture from the package.
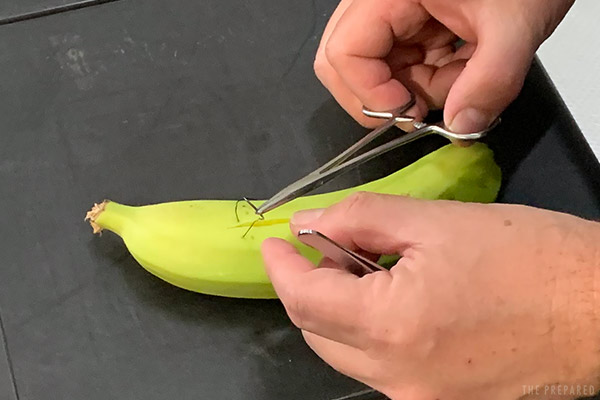
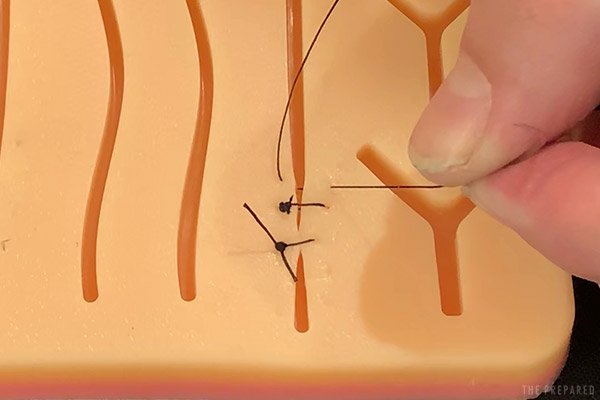
Note: The steps pictured are past a right-handed person.
Grip the needle mid-shaft. If using a needle driver, lock the clamp.
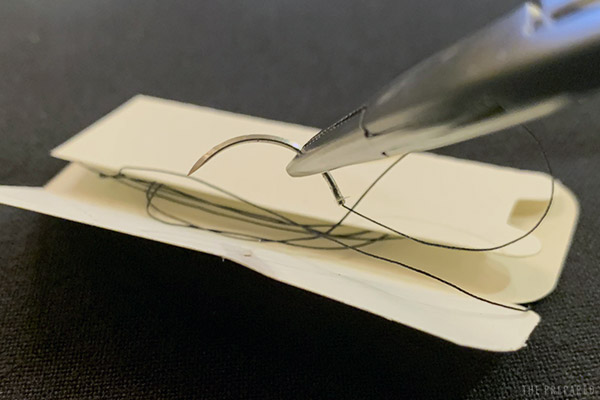
Because we're making ane sew together at a time (rather than i long chain of stitches), it's not a huge deal where you first stitching. Just utilize your head.
But it's ordinarily easiest to start with the edge of the wound furthest away from yous (as pictured beneath).
Grab the edge of the wound with your tissue forceps and gently lift the edge.
Push the needle direct into the skin at a ninety caste angle almost a one-half centimeter from the edge.
You're just sewing the skin; don't become deep plenty to pierce fatty.
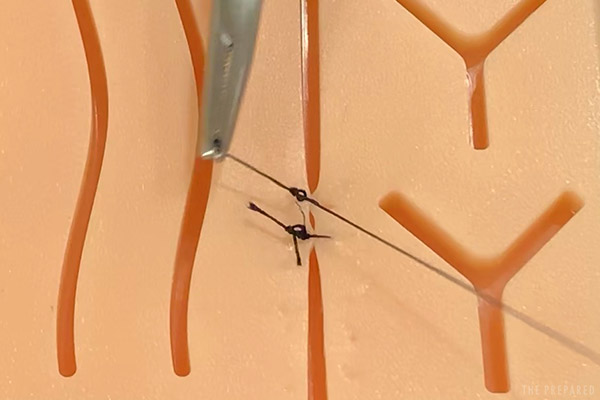
Rotate your hand and then that the needle starts the "U"-shaped curve, passing across the wound channel and into the other side. Don't work with crazy angles; keep the holes on each side as foursquare to each other as possible. You lot can (carefully) employ your fingers to line upwards the wound edges.
Release the edge that y'all are holding with the tissue forceps and grab the opposing side. Consummate the U-turn and bring the needle up through the pare on the other side.

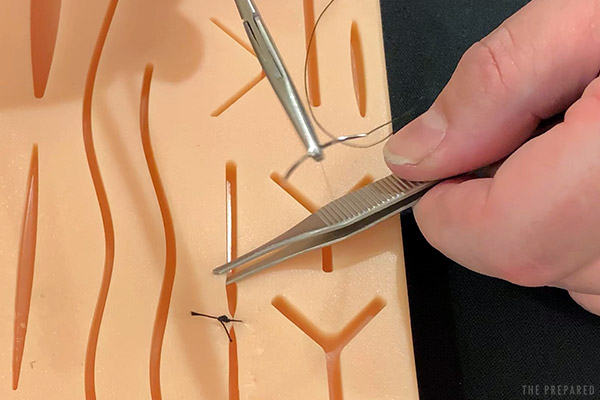
Grab the thread only below the needle with your fingers or the needle driver. Pull the thread through until y'all have an inch or two left on the starting side, and then identify the needle down.
Creating the knot in the next steps might seem tricky at first. But you lot're basically making a series of simple overhand knots using the needle driver tool to wrap and pinch the thread.
Hold the needle commuter with one paw. Use your other paw to wrap the long stop (the end you just pulled through) of the thread twice around the tip of the needle commuter.
Pay attending to the direction (clockwise or counter-clockwise) you wrap around the forceps. It will thing later.
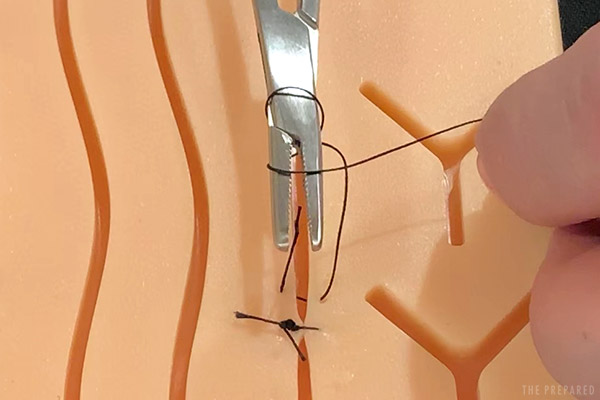
The wrap should exist snug, simply loose plenty that you tin still open the tip of the tool merely enough to pinch some thread.
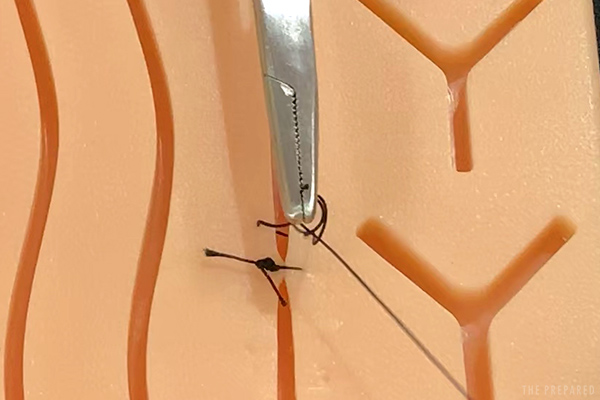
Pinch the tail/short end of the thread with needle driver clamps.
Using the hand already holding the suture thread, gently pull the thread and then it slips off the tool.
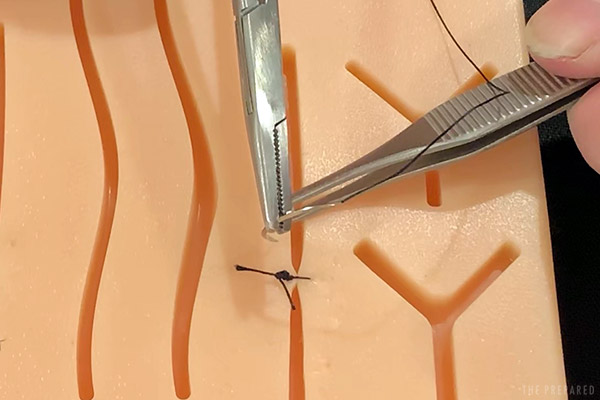
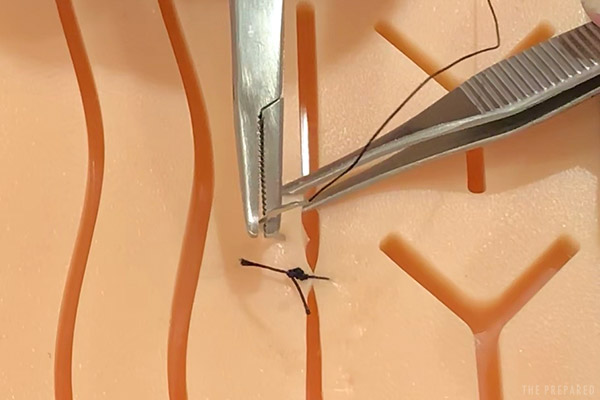
Tighten until the edges of the wound are approximated with the knot laying flat on i edge of the wound.
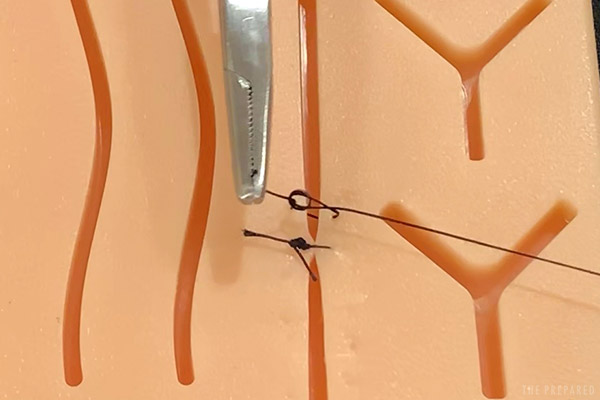
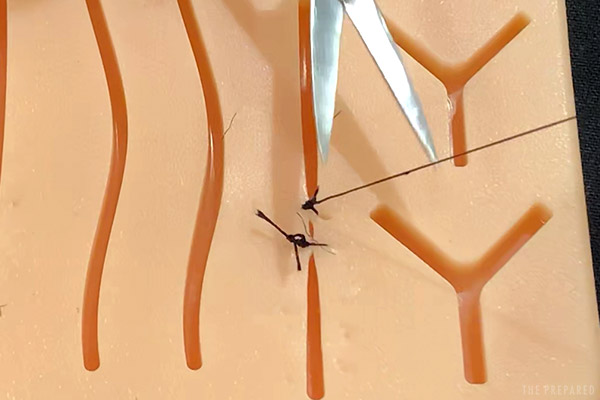
You just completed ane "throw." You desire to finish up with 5-6 throws on a given sew, layering knots on top of each other.
Alternate the management (clockwise or counterclockwise) of how you loop the thread around the tip of the needle commuter on each throw. Switching back and forth makes the knots more secure.
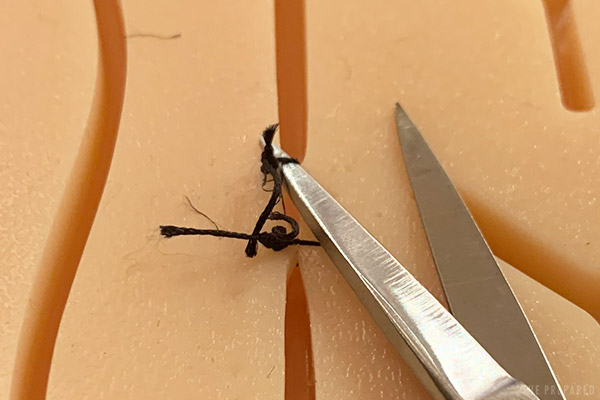
Cut off the extra thread on both sides one time you're washed with the throws. You don't desire to get too close to the knot, otherwise it might skid apart.
Repeat at i/iv-inch intervals until you take closed the wound.
Tip: Make removal and inspection easier by keeping all of your knots on i side of the wound.
Sutures should come up out in one to two weeks. Stitches in low-employ areas of the body (like the face or scalp) can come out in 7-x days. High-use areas (similar the torso or legs) should stay in for for the full 14 days.
When it is fourth dimension to remove the sutures you merely cut the thread to one side of the knot and pull the thread out. Be gentle and smooth with your movement — the thread should come out easily.
Suture techniques
Suturing is a diminishable skill with multiple layers of complexity. If yous don't practice every once in a while, you'll probably forget when the need arises years later.
There are multiple suturing techniques. For example, a professional might sew together a very deep wound in layers, starting at the deep terminate and working up towards the surface. Otherwise you'd just close the surface and create a subconscious cave where infections throw a party similar their parents are out of boondocks.
Nosotros focus on the simplest and near relevant blazon of suturing: interruptive.
Unlike continuous stitching that keeps the line unbroken and simply secures at the ends, interruptive stitching is washed ane piece at a time. Each stitch is solo.
Austere medicine experts recommend the interrupted method because, even though it'southward non the simplest method to teach, it uses a small amount of suture thread for each stitch (and then you can conserve resources) and is the more forgiving if y'all make a mistake on a particular sew together.
How to staple a wound
Stapling is much easier to do than suturing. Simply you run the chance of heavier scarring on the patient and it requires specific equipment.
Only apply medical staplers and staples. Part staples come out in a "U" shape, then are bent by the bottom side of the stapler into the final closed form. Medical staples work differently since there isn't a metallic backstop to force the "U" into a "B".
Starting at the border of the wound, center the caput of the stapler over the wound line.
Press downward firmly and squeeze the stapler.
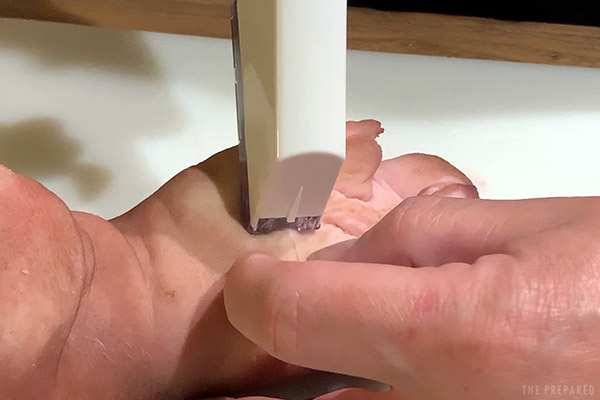
Motility downwards one/8 to 1/4 of an inch. Echo.
The skin may form a natural elevated ridge under and along the staples, as seen below. It's non a trouble as long as you're post-obit the communication above nearly avoiding inversions.
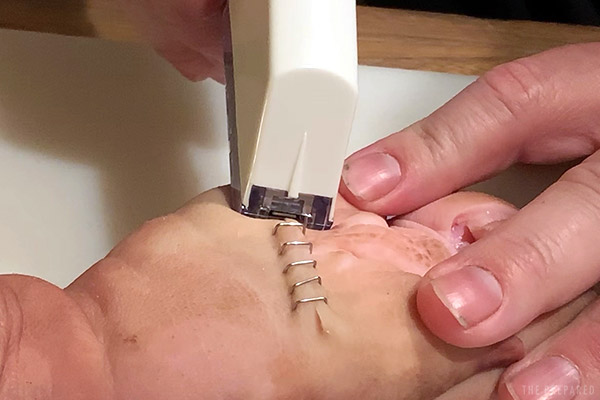
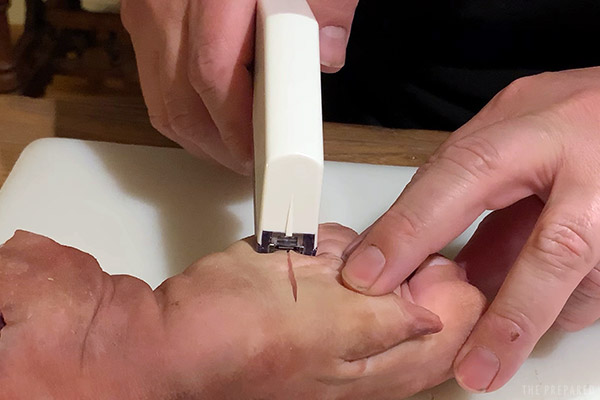
Assuming there are no signs of infection in the meantime, staples should exist removed from thinner, faster-healing tissues (similar the scalp) in seven days. Thicker tissues (like the buttcheek) should look for x days.
The best way to remove staples is with a medical staple remover. The three teeth (one on top in the eye, 2 on bottom) are designed to pinch the staple and fold it upwardly and out of the wound.
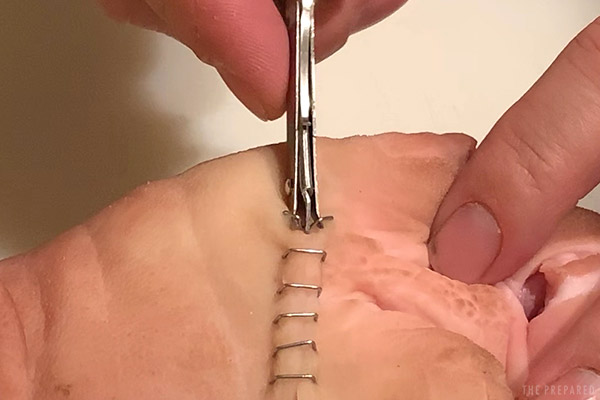
Tip: If you need to improvise, try to mimic the iii tooth blueprint and move of the medical staple remover. Don't just grab the staples with pliers and pull — you lot'll likely cause a bit of tissue harm. So take your time.
Glue
This prepper hack comes upwards frequently on social media as a cool fashion to easily close a wound. Information technology does take merit, and we know overworked nurses who glue their children'due south cuts before sending them back out to play. But it's not the miracle some make information technology out to be.
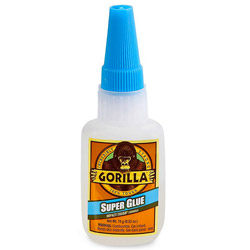
Although it's quick and hacky, using glue should be your last resort as a closure technique considering it'southward very hard to open the wound back upwardly if you need to treat an infection. The glue besides completely shuts off the within of the wound, potentially trapping besides much moisture or contamination.
Never use mucilage if there are signs or high risks of infection, and avoid areas effectually mucous membranes (mouth, nostrils, optics, genitals). The curing process of non-medical superglue creates chemicals that irritate mucous membranes.
The most common blazon of adhesive used to shut a wound is cyanoacrylate, the main component of superglue. While you tin can technically utilize the lilliputian super glue tube from your toolbox, there are a few differences between civilian products and medical-form adhesives.
Medical glue
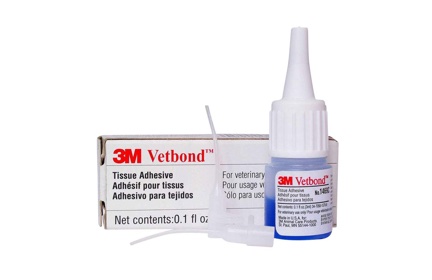
Vetbond
Favorite among medics. Dyed blue and then y'all can see what you're doing. Reusable tip. Cures quickly.
- Check cost on Amazon
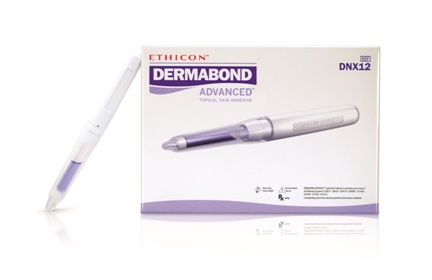
Dermabond
Another favorite among medics, although very expensive for the amount you lot get. This link is to a single-apply vial.
- Check toll on Amazon
Medical adhesives accept unlike additives that make the glue less toxic and more than flexible. They are less irritating to the tissues and carry a smaller risk of aggravating infections. The flexibility allows for a piffling bit of motility which reduces the chance of a wound tear.
Some patients tin be allergic to the chemicals in the agglutinative, and it should never be used in situations where wound healing can be delayed (wet environments, high altitude, very common cold environments, patient is diabetic, etc.)
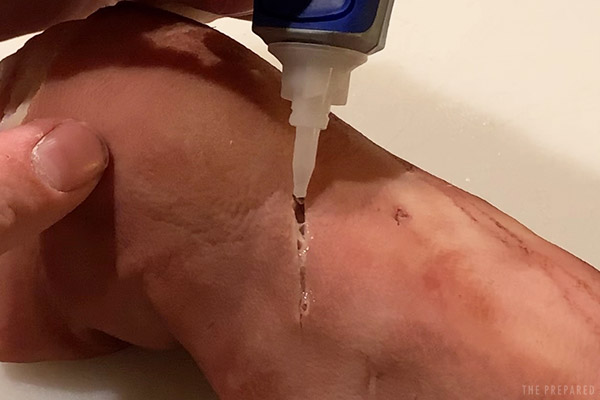
How to glue a wound:
- Approximate the wound edges.
- Carefully apply gum to the wound channel. Less is more, so use as little as needed.
- Hold the edges until the gum cures.
Ideally, the wound heals and the glue naturally goes away.
If you need to remove the glue, there are a couple of means that are not pleasant. Cyanoacrylates tin can be removed with acetone. Equally you can imagine, acetone is pretty toxic to healing pare and will cause a lot of discomfort for your patient.
It's possible the glue has seeped into the wound in such a way that tissue will need to exist cut off for removal — yet another reason this is a terminal-resort method.

Source: https://theprepared.com/survival-skills/guides/close-wound/
Posted by: tierneycanothed.blogspot.com
0 Response to "How To Clean A Wound To Avoid Tetanus"
Post a Comment